0. Article Overview
This article introduces the steps to display a 3D object (cube) in VR using Meta Quest. You can also confirm the operation in the 01-ShowObject scene of the sample published on GitHub.
Furthermore, this article is a continuation of the following. Please check if there are no differences in settings, etc.
1. Creating a Scene
- Click File->New Scene
- In the New Scene window, select Standard (URP) and click Create

- Click File->Save
- Set the scene name and save it
* In this article, it is set to ShowObject
2. Setting up the Camera for Quest
- Delete Main Camera in the Hierarchy
- In the Project tab's search area, enter CameraRig
- Select All from the dropdown menu just below the search area
- Drag and drop OVRCameraRigInteraction or OVRCameraRig from the search area to the Hierarchy
*OVRCameraRig is a prefab with the simplest camera settings, and OVRCameraRigInteraction is a prefab with settings for hand and controller interaction.
*In this series, we will use OVRCameraRigInteraction in anticipation of future interaction. - Click OVRCameraRig under the child elements of OVRCameraRigInteraction
- Find OVR Manager in the Inspector to set detailed information about Quest
- If you are a Quest 3 user, turn on Quest3 in the TargetDevices section
- In the Tracking Origin Type section, select Floor Level
* The Tracking Origin Type is important for determining the height of the origin.
For Floor Level: The height of the floor is the origin
For Eye Level: The height of the Quest when the app is launched is the origin
* If you want to fix the display height of the object relative to the room, select Floor Level. If you want to fix the object relative to the initial position of the Quest, select Eye Level.
[Optional]
This operation is optional. By unpacking the original OVRCameraRIgInteraction prefab and disconnecting it from the OVRCameraRIgInteraction used in this scene, unexpected changes can be prevented.
- Right-click OVRCameraRigInteraction
- Prefab -> Unpack Completely
3. Setting Hand Tracking and Controller ON/OFF
This article does not perform interaction using hands or controllers, but I think it's fun to visually confirm that they are recognized by Quest during the operation confirmation in this article, so I'll introduce the setting procedure.
- Click OVRCameraRig under the child elements of OVRCameraRigInteraction
- Find OVR Manager in the Inspector to set detailed information about Quest
- From the Quest Features section, find Hand Tracking Support and select your preferred mode
Controllers Only: Only controllers operate and hand tracking is disabled
Controllers and Hands: Both controllers and hand tracking operate
Hands Only: Only hand tracking operates - We assume that Controllers and Hands are selected for this series.
4. Object Placement
- Right-click in the blank space of the Hierarchy without selecting any other objects
- Click 3D Object -> Cube

- Click on the Cube added to the Hierarchy
- Set the position, rotation, and size of the Cube in the Transform of the Inspector
* In this article, the following settings are used to display a slightly tilted cube equivalent to 0.3m from the origin at a height of 1.3m from the floor and 1m ahead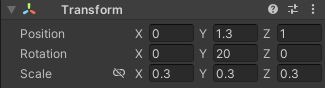
5. Operation Check
[To install on a device]
- Connect the Quest and PC with a USB cable
- In the Unity Editor, click File -> Build Settings
- Click Build And Run
- Set the installer (apk) name in alphanumeric characters and save it
- Once the installer generation and installation are complete, the app will automatically launch on the Quest.
- The cube should be displayed in front of you. If it is displayed in a different direction from the front, press and hold the meta (oculus) button on the right controller to reset the orientation
- If an error occurs during installation, review the settings or create only the apk once for installation from SideQuest or MetaQuestDeveloperHub.
[When using Meta Quest Link (Windows)]
For details, please refer to the official page.
- Connect the Quest and PC with a USB cable
- Launch Quest Link on the Quest
- Click the Play button in the Unity Editor
- The cube should be displayed in front of you. If it is displayed in a different direction from the front, press and hold the meta (oculus) button on the right controller to reset the orientation
6. List of Articles on Meta XR SDK