0. Contents of This Article
This article introduces how to operate buttons as an example of Unity UI operation on Meta Quest. First, this article confirms that hands and controllers can interact with buttons, and then explains how to make the cube disappear when a button is pressed as an example of interaction. You can also check the operation in the sample 04-UiInteraction or 04-UiInteraction-AR scene published on GitHub.
*This video is for AR, but it supports both AR and VR.
It should be noted that this article assumes manipulating the cube displayed in VR or AR scenes created with the following links. Since it starts with just viewing the cube in Quest without adding any special components to it, you can achieve object manipulation in other projects by following the content of this article and subsequent articles. (Assumes the use of OVRCameraRigInteraction prefab instead of OVRCameraRig)
[VR Version]
[AR Version]
1. Duplicate the Scene
It is possible to edit the scene created in the above article, but to try object manipulation without breaking it, duplicate the scene. Skip if not needed.
- Open the VR version or AR version scene created until last time
- Click File -> Save As...
- Save the current scene with a new name, e.g., UiInteraction for this article
- Check that the scene name displayed in the Hierarchy is UiInteraction
2. Create UI
Create a button and place it in the 3D space.
- Right-click on the blank space in the Hierarchy
- Click UI -> Button - TextMeshPro
- When TMP Importer (Text Mesh Pro Installer) is displayed, click Import TMP Essentials
- Close TMP Importer
- Check if Canvas and EventSystem are added

- Select Canvas and find Canvas in the Inspector
- Change Render Mode to World Space
* By default, UI is placed on the screen, but this change allows it to be placed in 3D space - Adjust the size of the UI as follows by operating the parameters of Canvas in the Inspector
PosX: 0 Pos Y: 1.2 Pos Z: 0.8
Width: 200 Height: 90
Scale x/y/x: 0.003
* The white frame in the figure represents the area of Canvas.

3. Make UI Compatible with Interaction with Quest
At this stage, only the UI has been created, and interaction with the controllers or hands used in Meta Quest is not possible. Therefore, settings to realize interaction are made.
- Click on Canvas and click Add Component at the bottom of the Inspector
- Search for Pointable and click on Pointable Canvas displayed in the candidates to add it
- Drag and drop the Canvas object in the Hierarchy into the area to the right of the Canvas of the added Pointable Canvas

- Select EventSystem in the Hierarchy
- Uncheck the Standard Input Module in the Inspector
- Click Add Component and search for Pointable Canvas
- Click on Pointable Canvas Module to add it
* This uses input to the Pointable Canvas provided by Meta, not normal input
The above operations prepare for making the Canvas pointable by hands or controllers. However, just this is not enough to achieve interaction with UI, and in Meta XR SDK, you need to separately specify the position and size of the UI (Canvas) plane in 3D space as follows.
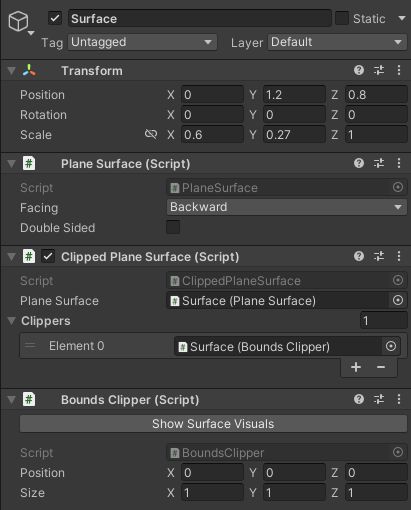
- Right-click on blank space in the Hierarchy and click Create Empty
- Name the GameObject generated by this action Surface
* Any name is okay - Click on Surface and focus on Transform
- Set the position and size of the Surface object to be the same as the Canvas
Position X: 0 Y: 1.2 Z: 0.8
Scale X: 0.6 Y: 0,27 Z: 1
* Scale is calculated from the Width x Scale(x), Height x Scale(Y) of Canvas. Z can be anything.
* It's okay to make it slightly larger or smaller than Canvas - Click Add Component in the Inspector of Surface
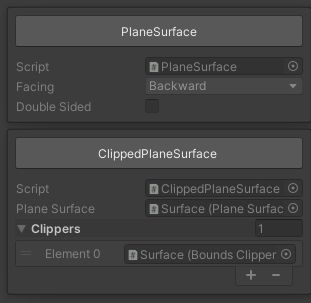
- Search for Plane Surface and click Plane Surface to add it
* This prepares the plane of the Surface object's position (equal to Canvas position) to interact with the pointer of the controller or hand. However, it's difficult to use because it's an infinitely distant plane, so clipping is necessary. - Click Add Component in the Inspector of Surface
- Click Clipped Plane Surface from the candidates to add it
* This allows interaction with the pointer only in the clipping area specified later - Click Add Component in the Inspector of Surface
- Search for Bounds and click Bounds Clipper to add it
* This adds a script to set the clipping area - Drag and drop the Surface object onto Plane Surface in Clipped Plane Surface
* This means applying clipping to the plane of the Surface object - Open Clippers in Clipped Plane Surface and click the + button
- Drag and drop the Surface object onto Element 0
* This means clipping in the area set by Bounds Clipper
* Although Size of Bounds Clipper is set to 1 1 1, consider it as a coefficient for Transform's Scale
* Even if you manually input Size 0.6 0.27 1 with Transform's Scale set to 1 1 1, the same result will be obtained
3. Remote/Proximity Interaction
With the above operations, the preparation for making buttons and their child elements interact with Quest is complete. However, settings regarding whether the UI responds to the Ray from the controller or hand or responds to the Poke operation touching the UI directly nearby have not been made yet, so the buttons cannot be operated yet.
Therefore, we will explain how to set up to correspond to operations using Ray and operations using Poke separately. It's okay to set up both.
[Remote operation using Ray]
- Click on Canvas and click Add Component at the bottom of the Inspector
- Search for Ray Interactable and add Ray Interactable displayed in the candidates
- Drag and drop the Canvas object into Pointable Element of the added Ray Interactable
* Link the operation with Ray and Pointable Canvas to enable UI operation inside Canvas - Drag and drop the Surface object onto Surface of the added Ray Interactable
- If the following dialog is displayed, select ClippedPlaneSurface
* Enable interaction only in the area set by Clipped Plane Surface
[Proximity operation using Poke]
- Click on Canvas and click Add Component at the bottom of the Inspector
- Search for Poke Interactable and add Poke Interactable displayed in the candidates
- Drag and drop the Canvas object into Pointable Element of the added Poke Interactable
* Link the operation with Poke and Pointable Canvas to enable UI operation inside Canvas - Drag and drop the Surface object onto Surface of the added Poke Interactable
- If the following dialog is displayed, select ClippedPlaneSurface
* Enable interaction only in the area set by Clipped Plane Surface
With the above operations, interaction with the button is now possible. Upon verification, it can be confirmed that the color of the button changes slightly when the button is clicked, as shown in the following video.
4. Behavior When the Button Is Pressed
The settings here are not specific to Meta XR SDK but are about the general behavior of UI in Unity. As an example, let's try making the Cube disappear when the button is pressed.
- Click on Button and find On Click in the Inspector
- Click the + button at the bottom right
- Drag and drop Cube onto the area with None written
- Open the drop-down menu written No Function
- Click on GameObject -> SetActive
- Make sure the checkbox is OFF
* This makes the Cube inactive when the button is pressed
Upon verification, it can be confirmed that the Cube disappears when the button is clicked, whether using Ray or Poke, as shown in the following video.
5. List of Articles Related to Meta XR SDK